Getting started for administrators
Sign up, set up your account, then finish setting up your organization in My Apps - verify your domain, connect company sign-in, invite your team and open your apps.
Online version, always current: https://cloudvision360.com/docs/guides/administrators/
This guide takes the first administrator of an organization from “nothing” to “my team uses the apps”. It takes about 20 minutes, most of it waiting for DNS. Everything happens in My Apps (my.cloudvision360.com), the one sign-in for CloudVision360, ITOps360, AgentVision360 and BackupVision360.
If someone already created your organization and you got an invitation email instead, skip to Set up your account.
Sign up
-
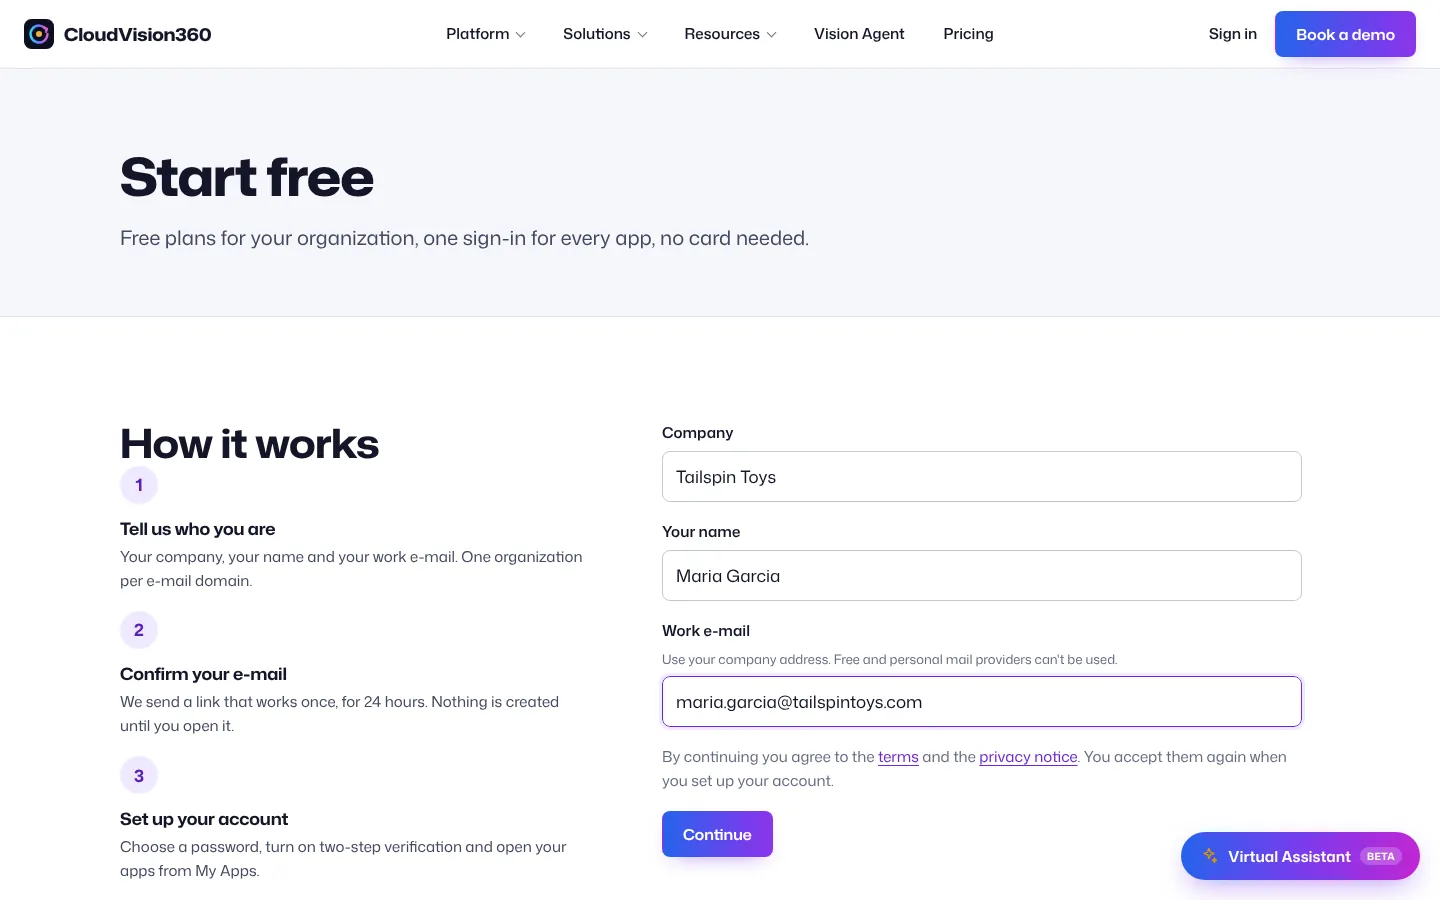
Go to the Start free page and enter your company name, your name and your work email. Personal and free email services (Gmail, Outlook.com and similar) can’t be used: your email domain becomes your organization’s domain.
-
Choose Continue. You see “Check your email”. Nothing is created yet.
One organization can exist per email domain. If your company already has one, the email tells you so: ask its administrator to invite you instead.
Confirm your email
-
Open the email Confirm your email to create your CloudVision360 account.
-
Choose Confirm and create my account. The link works once and expires after 24 hours.
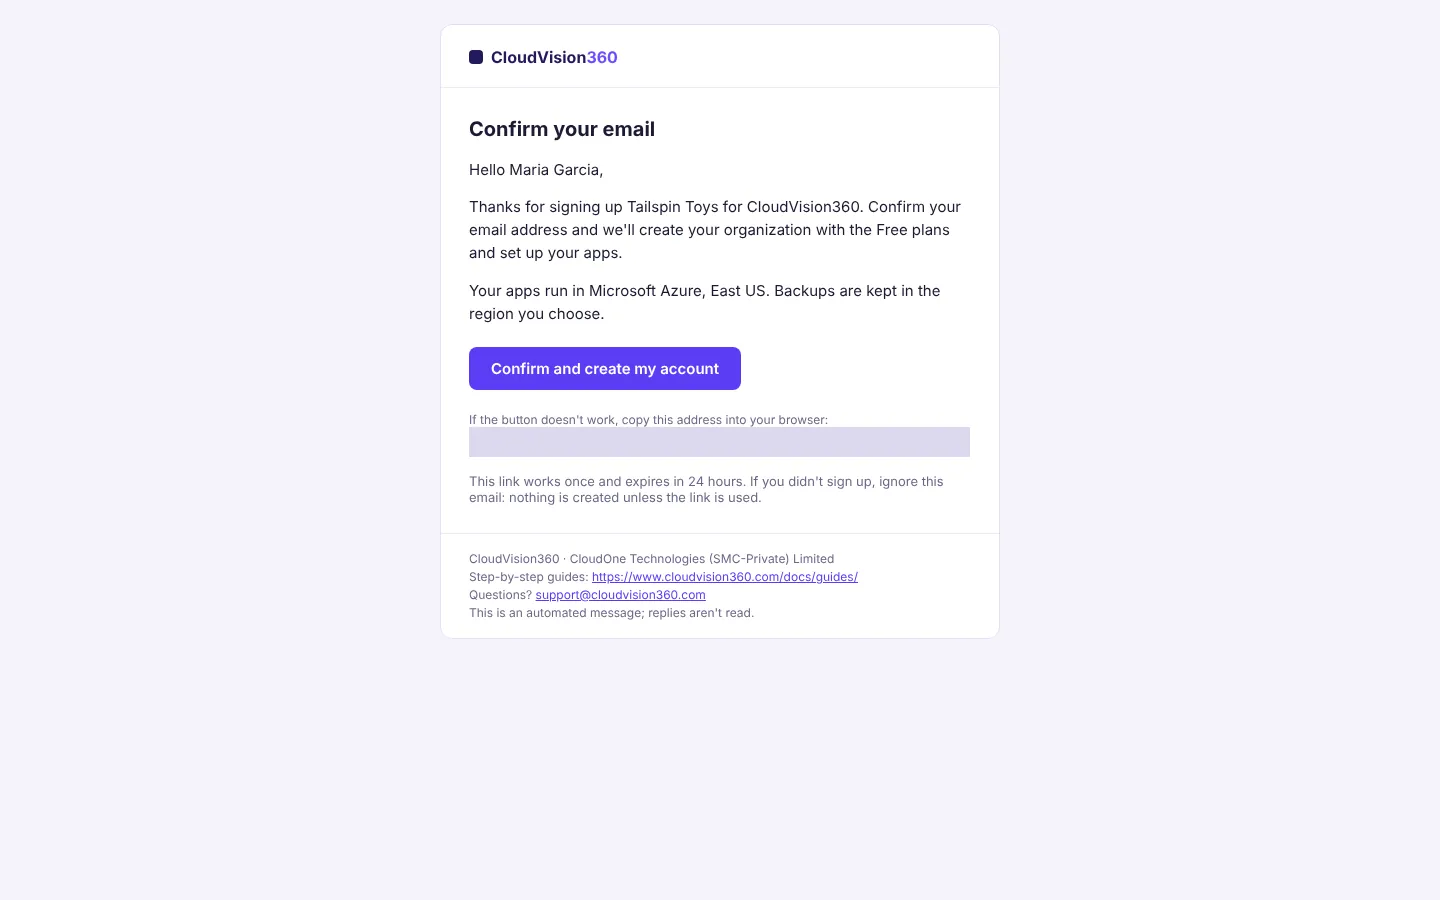
Your organization is created with the Free plan of every app, and you become its first administrator.
Set up your account
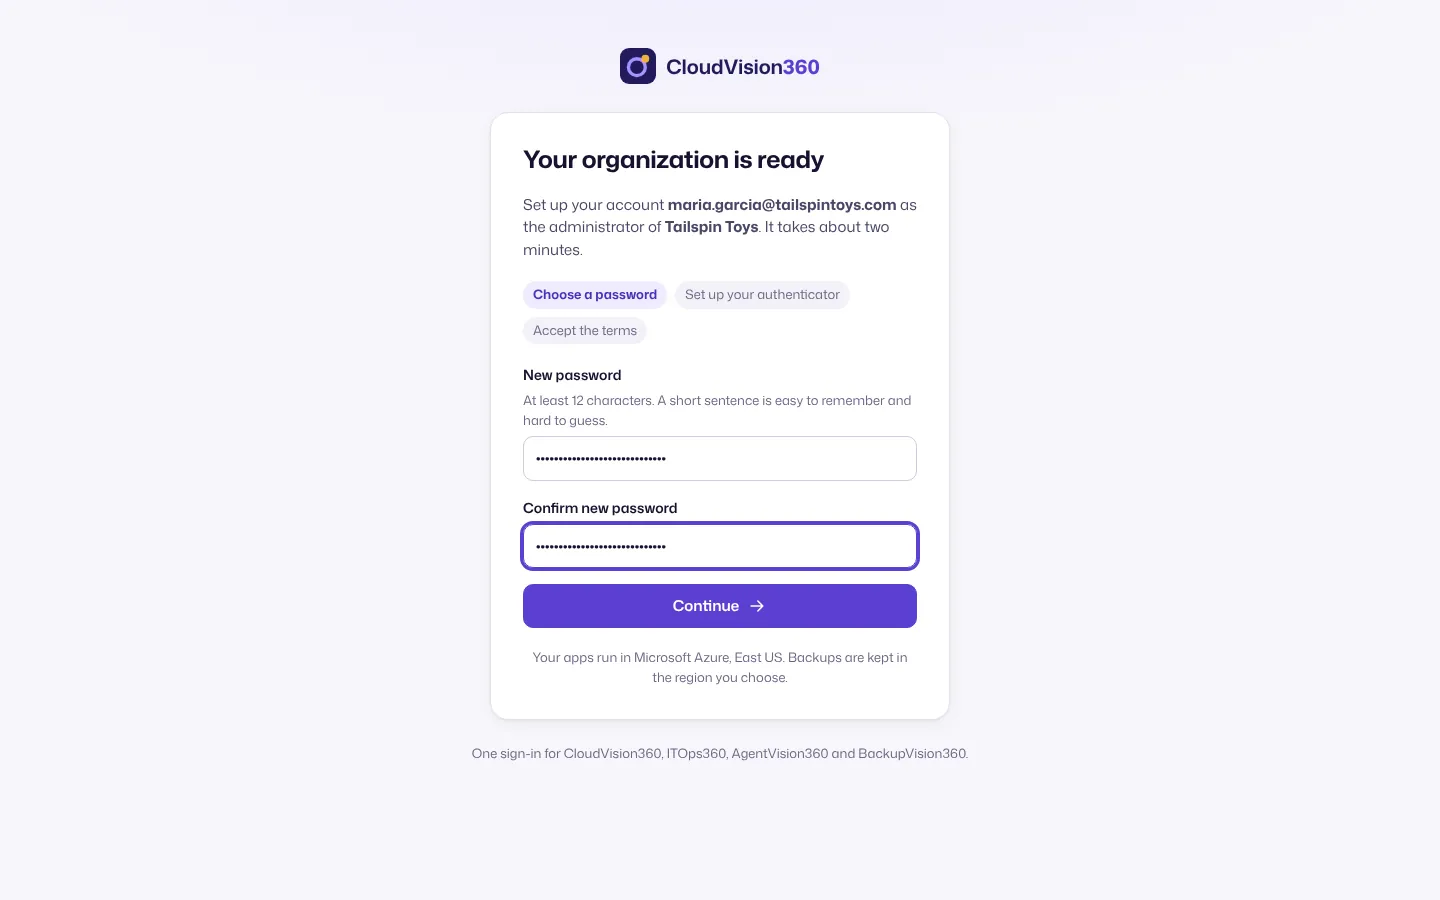
The same three steps apply to everyone you invite later.
-
Choose a password. At least 12 characters; a short sentence is easy to remember and hard to guess. Choose Continue.
-
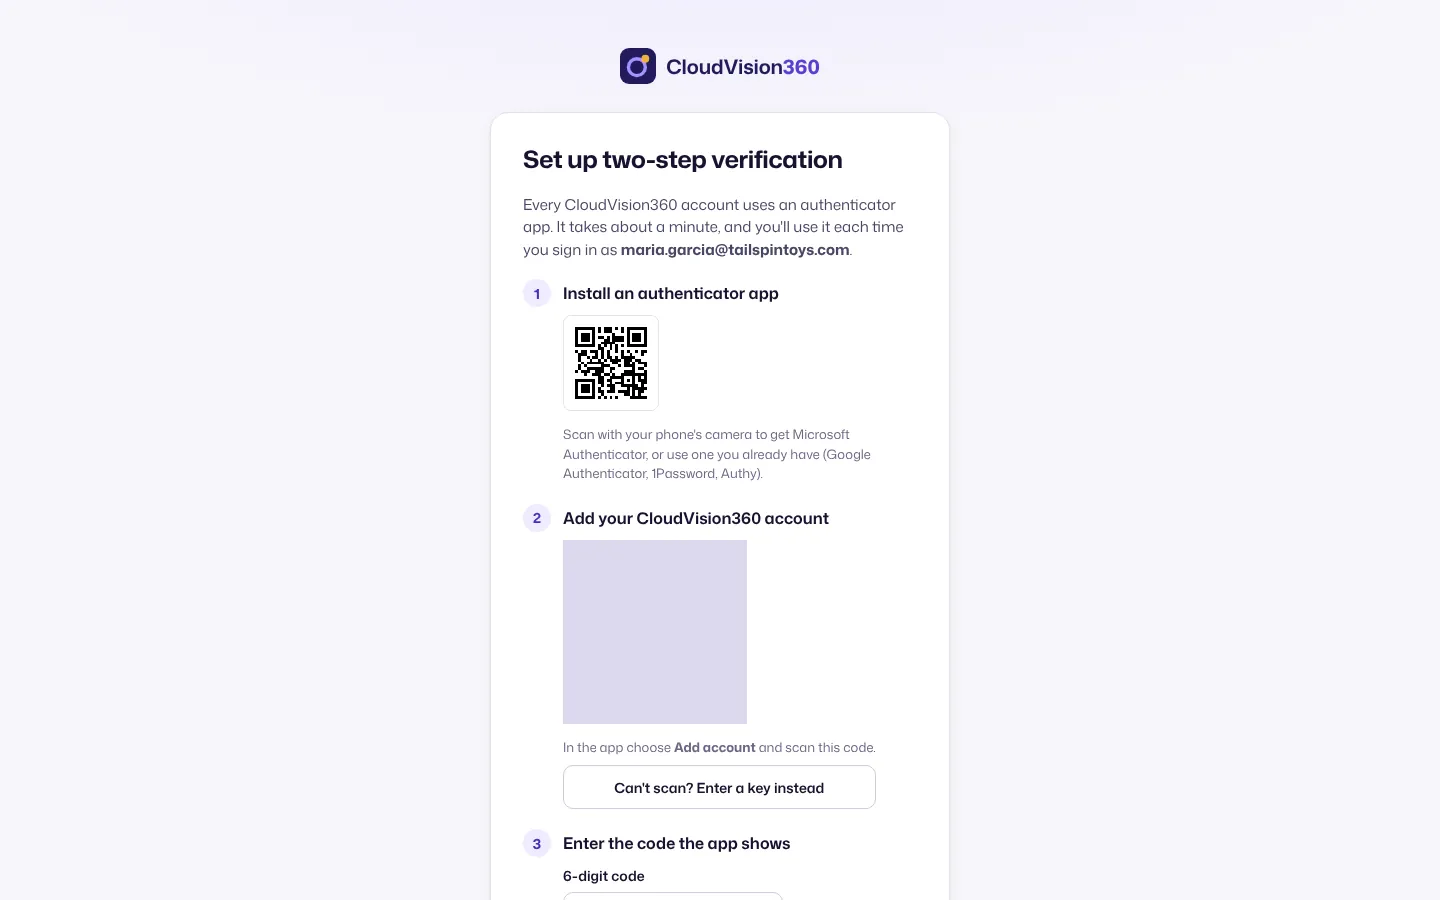
Set up two-step verification. Install an authenticator app on your phone (Microsoft Authenticator, Google Authenticator, 1Password or Authy), choose Show my QR code and scan it with the app (or choose Can’t scan? Enter a key instead). Type the 6-digit code the app shows and choose Turn on and continue.
-
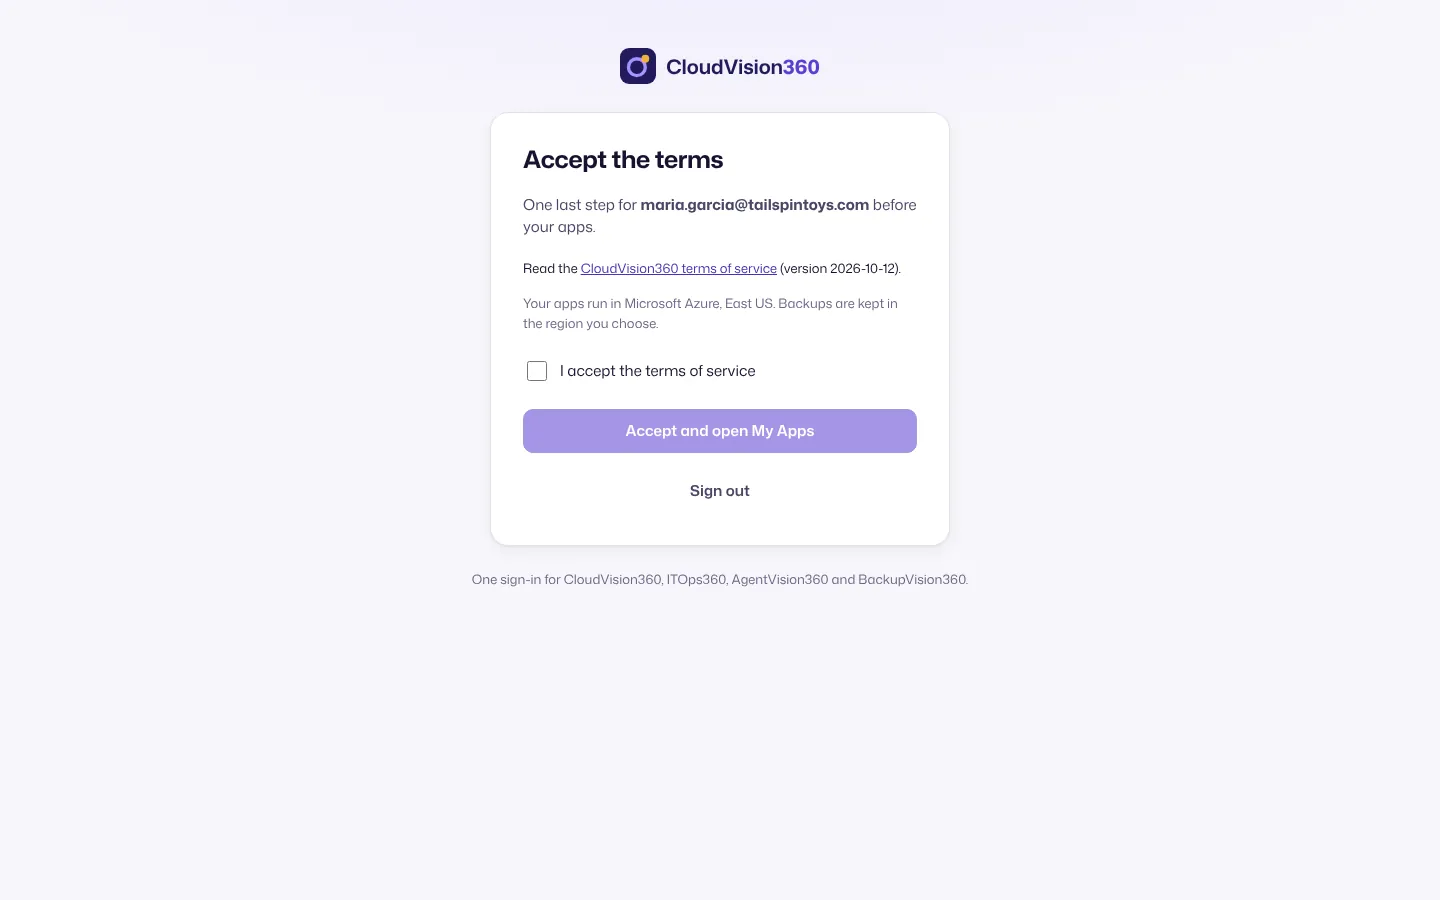
Accept the terms. Read the terms of service, tick the box and continue.
Never share the QR code or key: anyone who has it can produce your codes. If you lose your phone, another administrator can reset your authenticator (see Reset a password or authenticator).
Finish setting up
You land on My Apps. Administrators see a Finish setting up checklist until every step is done (or you choose Hide checklist). Each step ticks itself off when it’s really done, has a button that opens the right page, and a How to link to its section of this guide.
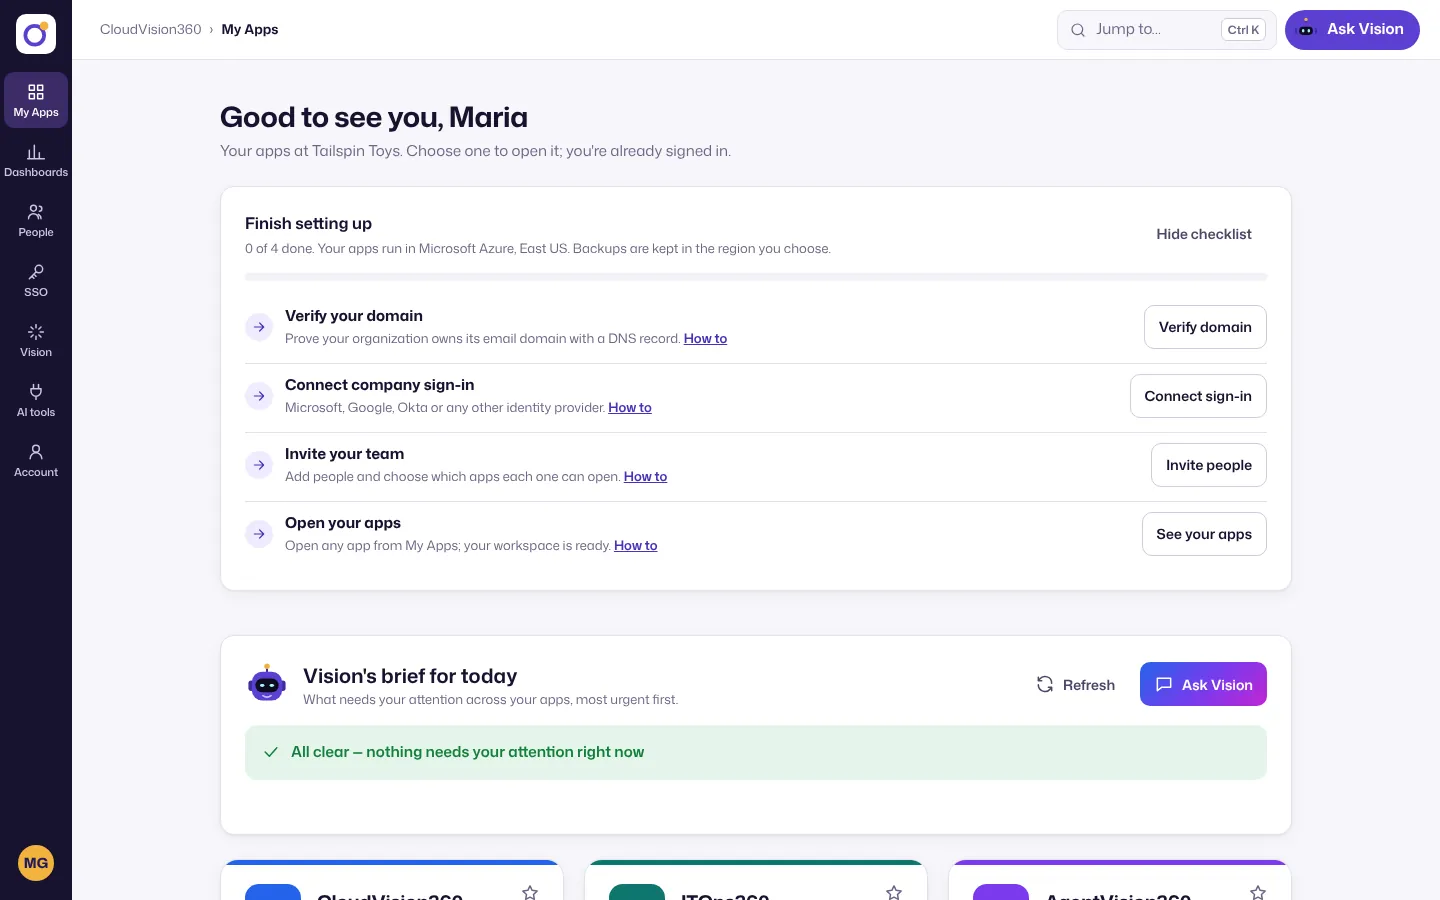
We also send a reminder 3 and 7 days after sign-up if steps are still open, with a link to the matching section of this guide.
Verify your domain
Verifying proves your organization owns its email domain. It’s needed before company sign-in can be required, and it stops anyone else from claiming the domain.
-
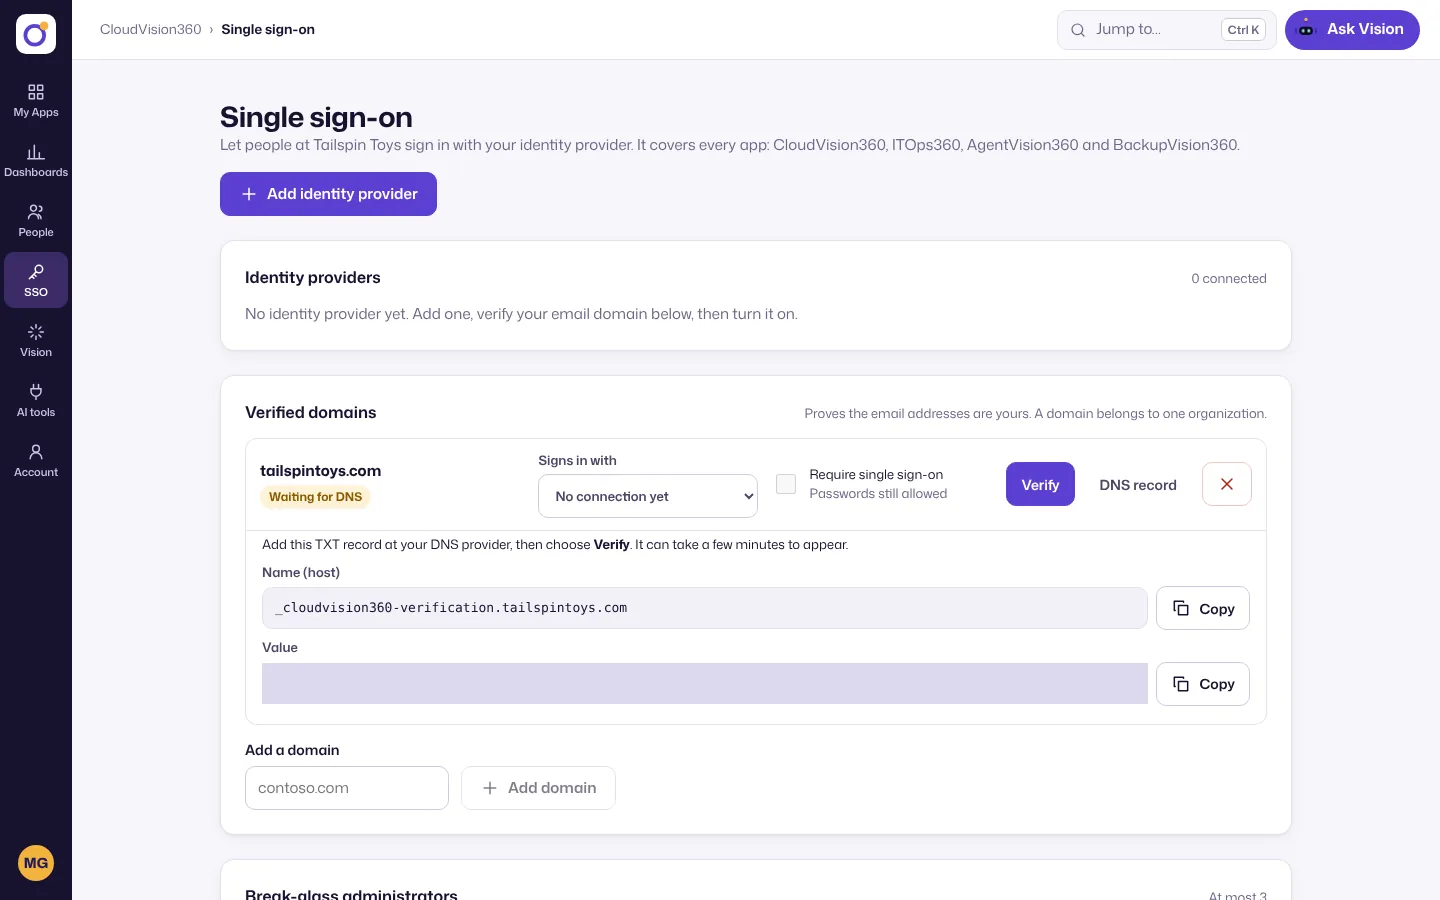
On the checklist choose Verify domain (or open SSO in the left rail). Your sign-up domain is already listed under Verified domains as Waiting for DNS. To add another domain, type it in Add a domain and choose Add domain.
-
Under the domain, copy the Name (host) and the Value of the TXT record.
-
Add a TXT record at your DNS provider with that name and value (see the notes below). Leave TTL at the default.
-
Back in My Apps, choose Verify. DNS changes can take a few minutes, sometimes up to an hour; choose Verify again if it isn’t found yet.
The status changes to Verified. Keep the record in place: we check it daily, and a domain becomes unverified after the record has been missing at three checks in a row.
DNS notes for common providers
| Provider | Where | What to enter |
|---|---|---|
| Cloudflare | Your domain → DNS → Records → Add record | Type TXT, Name: the host part only (_cloudvision360-verification; Cloudflare adds your domain), Content: the value. Proxy status doesn’t apply to TXT records. |
| GoDaddy | My Products → your domain → DNS → Add New Record | Type TXT, Name: _cloudvision360-verification, Value: the value, TTL: default (1 hour). |
| Microsoft 365 (domain managed by Microsoft) | Microsoft 365 admin center → Settings → Domains → your domain → DNS records → Add record | Type TXT (Text), TXT name: _cloudvision360-verification, TXT value: the value. |
| Others | The DNS or “zone editor” page of your registrar or host | Most providers want only the host part as the name. If yours wants the full name, paste the whole Name (host) as shown. |
Connect company sign-in
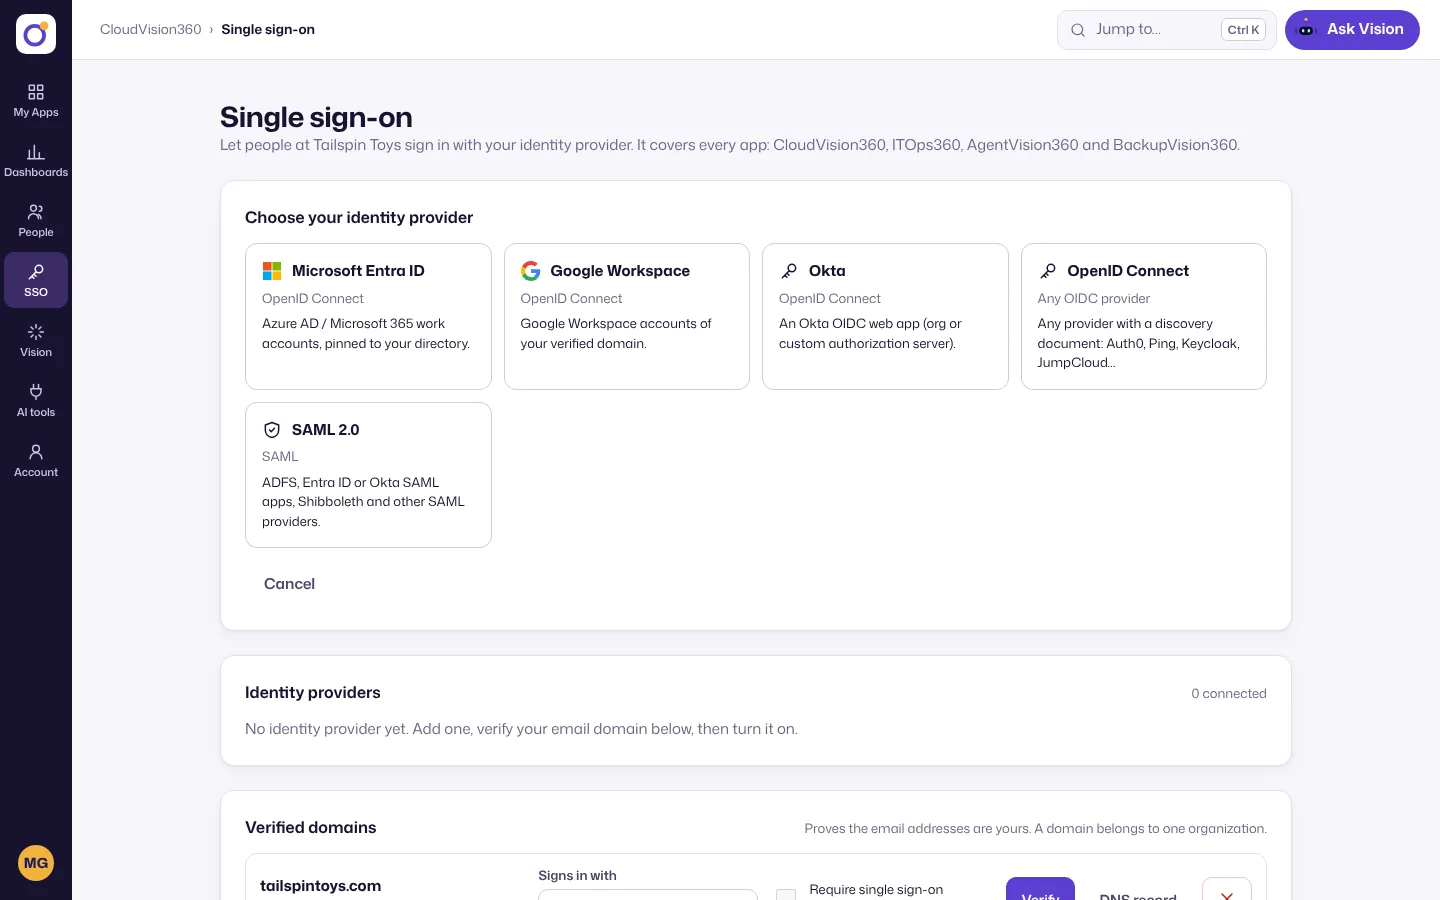
Let your people sign in with the account they already use for work: Microsoft Entra ID (Microsoft 365), Google Workspace, Okta or any other OpenID Connect or SAML 2.0 provider. They then don’t need a separate password, and your identity provider’s own MFA and conditional access rules apply.
-
On the checklist choose Connect sign-in (or open SSO), then Add identity provider.
-
Pick your provider.
-
Fill in the connection. For Microsoft Entra ID you can either use CloudVision360’s Microsoft app (no app registration of your own) or your own app registration: copy the Redirect URI into the app registration in Entra ID, then enter its Directory (tenant) ID, Client ID and Client secret. Google Workspace works the same way. For Okta, enter your Okta issuer URL (for example
https://your-org.okta.com) with the client ID and secret of an Okta OIDC web app.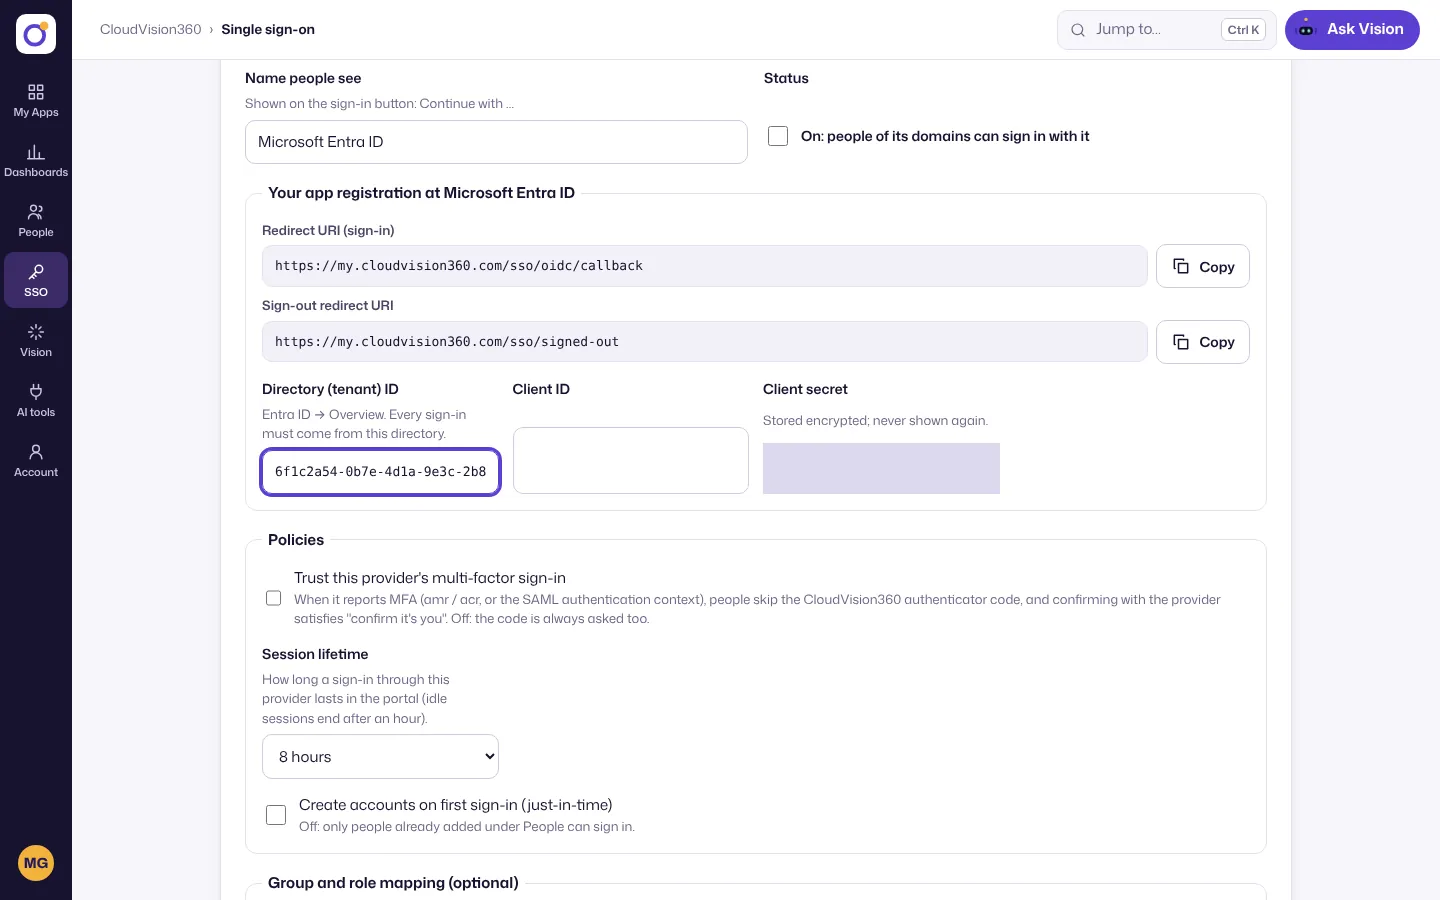
-
Tick On under Status and choose Add identity provider. Then choose Check configuration on the new connection to test it.
-
Under Verified domains, set Signs in with to the new connection. Once you’re confident it works, you can tick Require single sign-on for the domain.
When single sign-on is required, only the break-glass administrators you choose on the same page can still sign in with a password and authenticator, for when your identity provider is down. Group-to-role mapping, SAML metadata and the other options are covered in Single sign-on and MFA.
Invite your team
-
On the checklist choose Invite people (or open People in the left rail), then Add person.
-
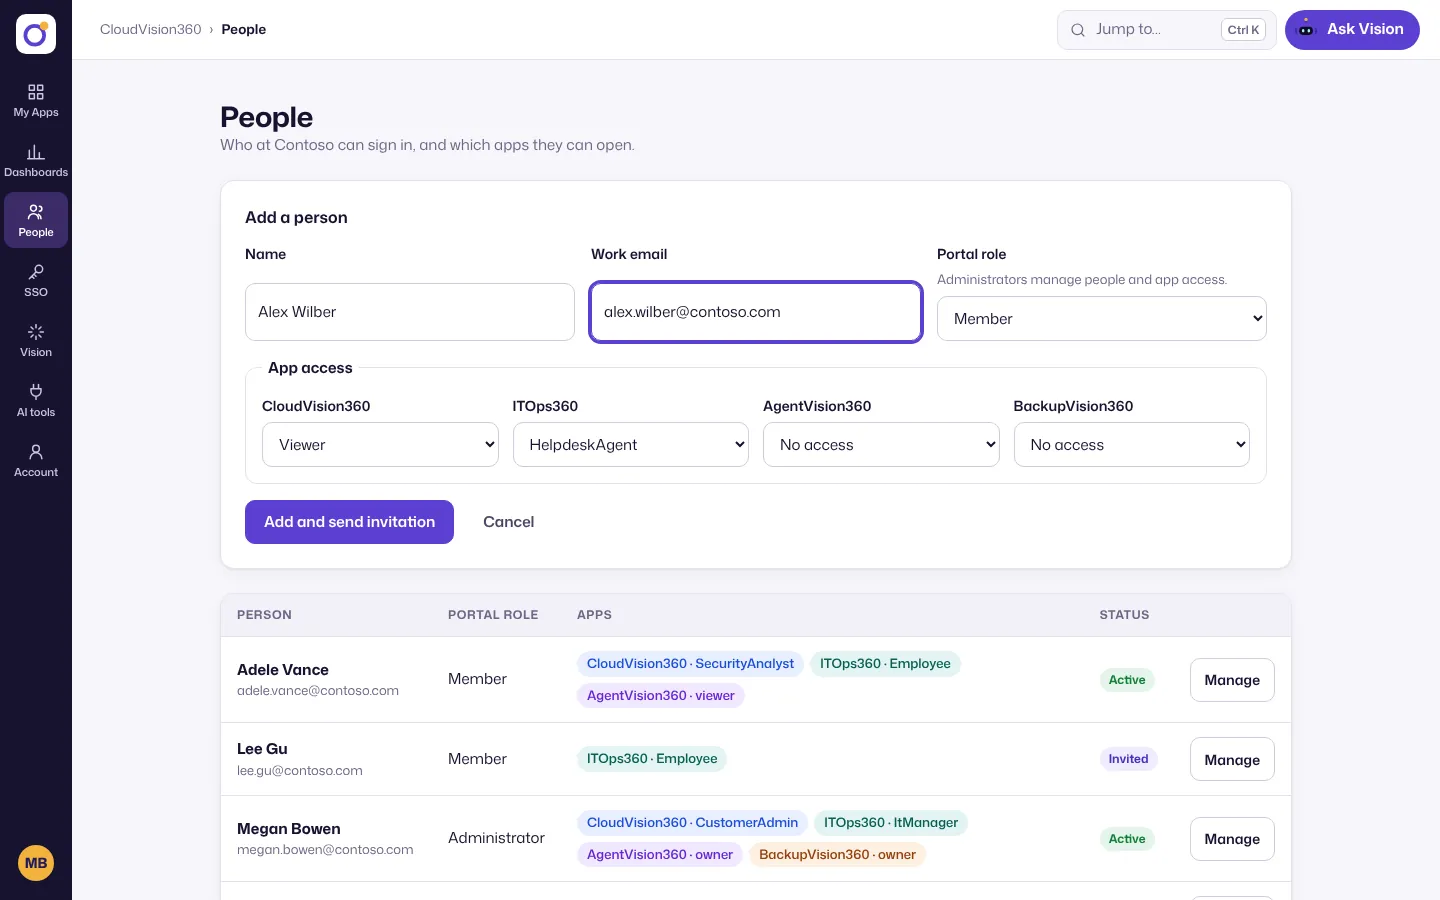
Enter the person’s Name and Work email, choose a Portal role (Member, or Administrator for people who manage people and app access) and, under App access, a role in each app they need. No access hides an app from them.
-
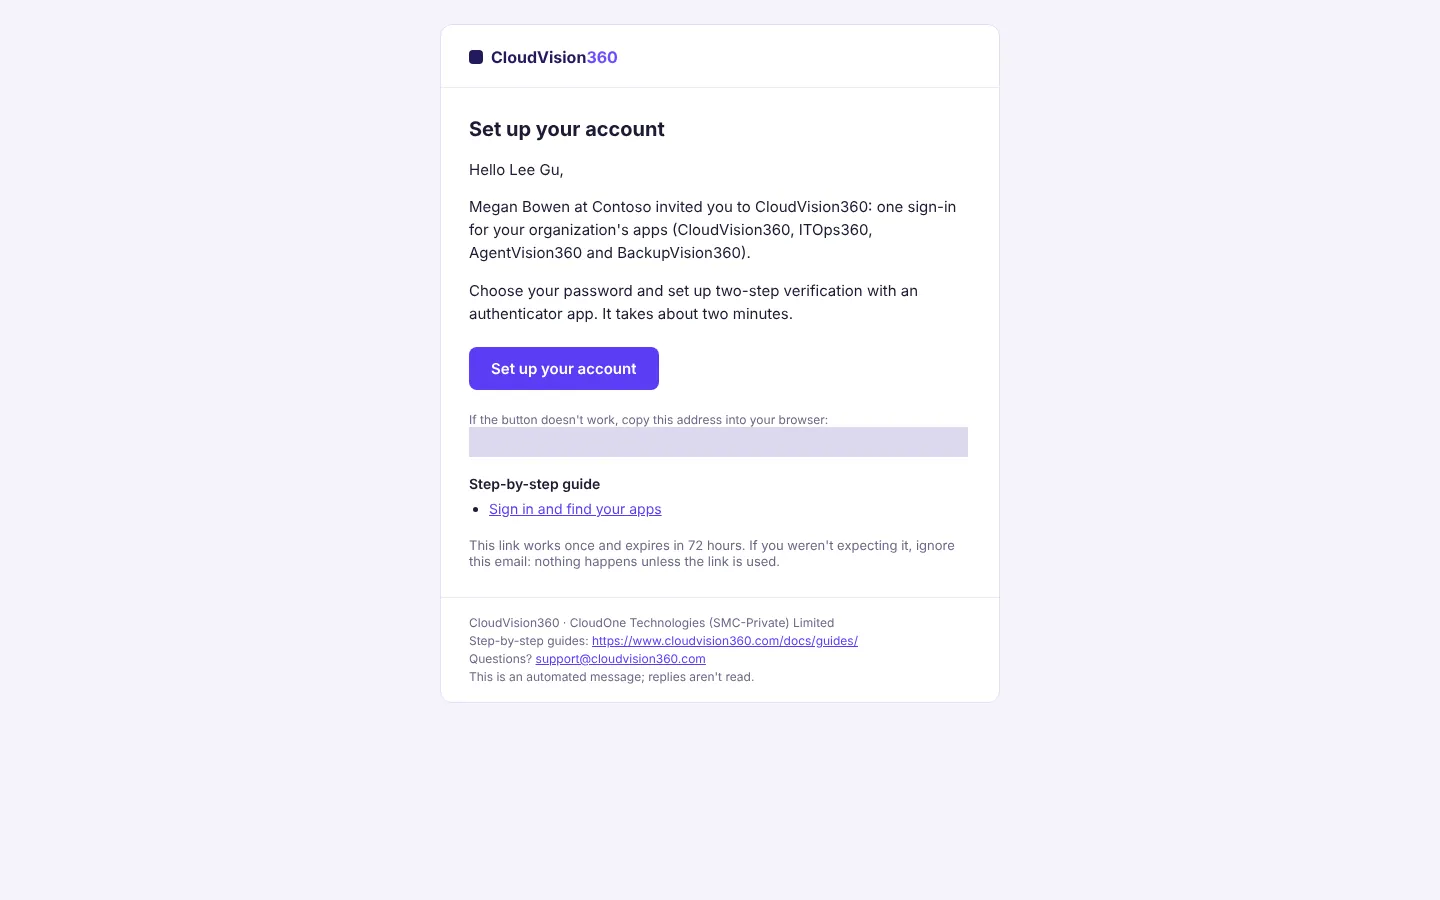
Choose Add and send invitation. They get an email with a Set up your account button; the link works once and expires after 72 hours.
The People page lists everyone with their apps and roles, and shows Invited until a person finishes setting up.
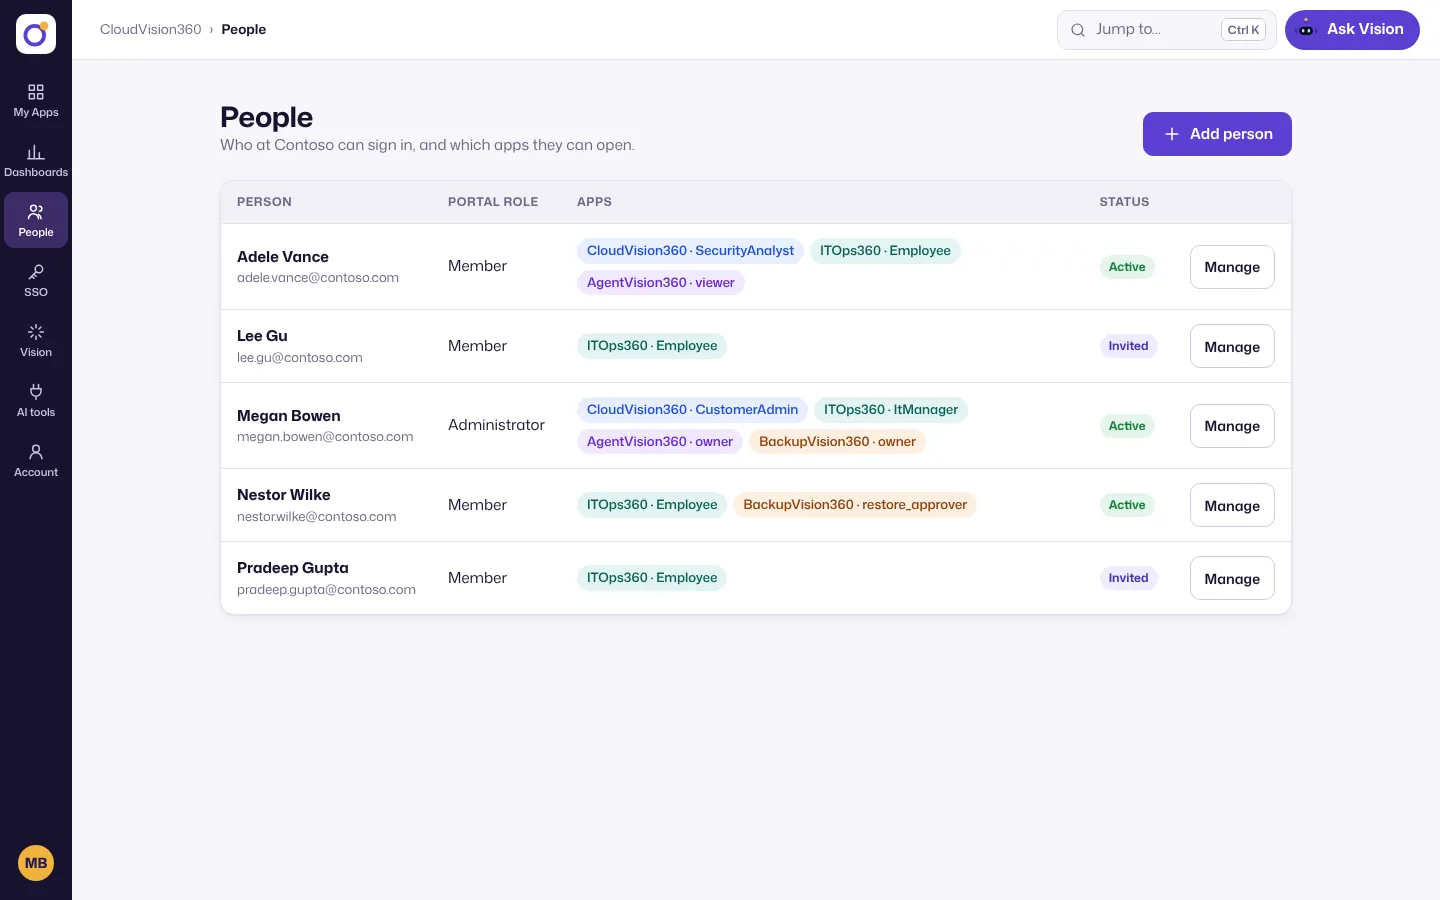
To change what someone can open later, choose Manage next to them, change the roles under App access and choose Save access. A change applies the next time they open the app. Which role does what is described in Roles and permissions.
If your domain signs in with your identity provider, invited people see Sign in with your provider instead of a password step.
Open your apps
Choose any app card on My Apps. You’re already signed in; the app opens on its Get started card, which walks you through that app’s own setup:
- Set up CloudVision360: connect a cloud, first scan, Fix first.
- Set up ITOps360: directory, devices, service catalog, technicians.
- Set up AgentVision360: AI providers, teams, budgets.
- Set up BackupVision360: storage, Microsoft 365 or a cloud, a protection policy.
Manage invitations
On People, choose Manage next to someone who hasn’t finished setting up:
- Resend invitation sends a new link and cancels the old one. Use it when the email got lost or the link expired (the status then shows Invitation expired).
- Withdraw invitation cancels the open link. The person stays on the list until you remove them; you can resend later.
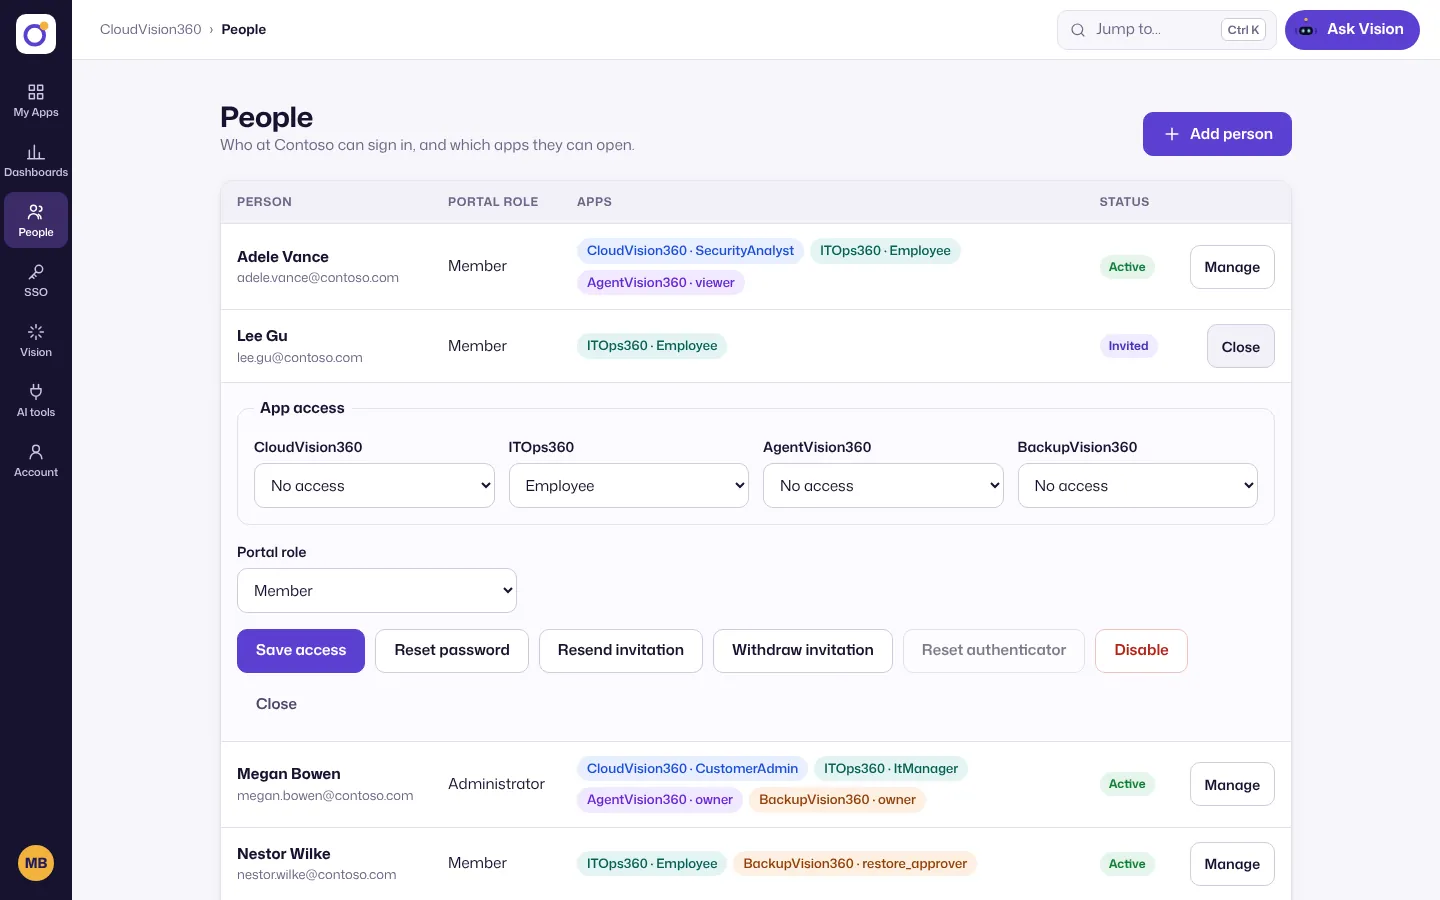
Resending is only possible for people who have never signed in. For someone who has, use the reset options below.
Reset a password or authenticator
People can’t reset their own password or authenticator: that keeps a stolen mailbox from becoming a stolen account. An administrator does it on People → Manage:
- Reset password gives the person a one-time password, shown to you once. Give it to them in person or by phone; they choose a new one at their next sign-in.
- Reset authenticator removes their authenticator; they set up a new one at their next sign-in.
People who sign in with your identity provider reset their password there, not here.
Change your plan or request an upgrade
Every app starts on its Free plan. As an administrator you see each app’s plan on its card in My Apps (for example “Starter plan” or “Trial: Professional until Nov 30, then Free”).
To move to another plan:
- In My Apps, choose Request an upgrade under the app’s card. You can also choose Upgrade on the app’s own plan page: Settings → My account in CloudVision360, Admin → Plan in ITOps360, Settings → Plan in AgentVision360 and Reports → Usage & plan in BackupVision360.
- Choose the plan you want and, if it helps, add a note (for example how many people or devices you need, or from when).
- Choose Request an upgrade. The CloudVision360 team gets your request and replies by email. Your plan changes when they set it; nothing is charged in My Apps.
On a trial, you get an email 7 days and 2 days before it ends. When it ends, the app returns to the plan named in the trial (usually Free). To keep the trial’s plan, request it as above.
Moving to a smaller plan never deletes anything: what you already set up keeps working, and the app only stops new use beyond the plan (for example adding another technician or cloud account). Organization administrators and each app’s own administrators can request an upgrade; other people see the plan in the app but not the button.